Run a speed test on almost any slow website and you will usually find the same culprit sitting at the top of the waterfall: images. A banner exported straight from Photoshop, product photos uploaded at full camera resolution, and PNG screenshots that should have been a fraction of their size can quickly slow down a website. Using an Image Compressor can significantly reduce image file sizes while maintaining good visual quality, helping improve page speed and overall website performance. Scripts and plugins get the blame, but heavy images are quietly doing most of the damage.
I have audited hundreds of sites as a web developer and SEO consultant, and fixing images is still the fastest, cheapest speed win I know. The hard part is not understanding that images need compressing. It is picking the right tool. Some compressors upload your files to unknown servers. Some cap you at a handful of images. Some are brilliant for one format and useless for another. And a few are WordPress plugins that only help after the heavy file is already on your server.
So I compared the options that people actually use, and narrowed them down to the 10 best image compressor tools for website owners, bloggers, store owners and developers. For each one you will find what it does well, where it falls short, and who it suits best.
Full disclosure: the first tool on this list is our own, the SiteAuditHub Image Compressor. I have explained it in the most detail because I know exactly how it works, but I have been honest about every tool on this list, including ours.
Here is what this guide covers:
- What to look for in a good image compressor
- A quick comparison table of all 10 tools
- A detailed review of each tool, with pros, cons and best use case
- How to choose the right tool for your situation
- Practical tips to compress images without visible quality loss
What Makes a Good Image Compressor?
Before we get into the list, here are the criteria I used to judge each tool. Keep them in mind, because the “best” tool depends on which of these matter most to you.
1. Compression quality
The whole point is a smaller file that still looks the same. A good compressor removes data your eyes will not miss, and avoids the blocky patches, colour banding and blurry text that come from over-compression.
2. Format support
At minimum, a website compressor should handle JPG, PNG and WebP. Bonus points for converting between formats, because switching a heavy PNG photo to WebP often saves more than any quality setting.
3. Control
Beginners want a one-click result. Experienced users want quality sliders, target file sizes and a way to compare before and after. The best tools offer both: sensible defaults with the option to fine-tune.
4. Privacy
Most online compressors upload your images to their servers, process them there and delete them after a few hours. That is fine for a blog photo, but not ideal for client work, unreleased products or personal documents. Tools that process images inside your browser never send your files anywhere.
5. Batch processing and limits
If you optimize images regularly, one-at-a-time tools get tiring fast. Look at how many images you can process at once, the maximum file size, and whether there is a monthly cap on the free plan.
6. Price and sign-up
Many excellent tools are completely free. Others are free up to a limit and then paid. A tool that forces you to create an account just to download three images is a tool most people abandon.
7. Workflow fit
Some people want a quick web tool. Others want a WordPress plugin that optimizes every upload automatically, a desktop app for bulk work, or an API for developers. The right answer depends on how you work.
Best Image Compressor Tools at a Glance
| # | Tool | Type | Formats | Where processing happens | Free? | Best for |
|---|---|---|---|---|---|---|
| 1 | SiteAuditHub Image Compressor | Web tool | JPG, PNG, WebP (convert between all three) | In your browser | Free, no sign-up | Private, quick batch compression and conversion |
| 2 | TinyPNG (Tinify) | Web tool, API, WordPress plugin | JPG, PNG, WebP, plus conversion options | Server | Free web tool with limits; paid Pro and API | Reliable one-click compression |
| 3 | Squoosh | Web app | JPG, PNG, WebP, AVIF and more | In your browser | Free, open source | Fine-tuning a single image |
| 4 | ShortPixel | Web tool, WordPress plugin | JPG, PNG, GIF, WebP, AVIF | Server | Free quota; paid credits | WordPress sites needing automation |
| 5 | Compressor.io | Web tool | JPG, PNG, GIF, SVG, WebP | Server | Free with file-size limit | Lossy vs lossless choice |
| 6 | iLoveIMG | Web tool, apps | JPG, PNG, GIF, SVG | Server | Free with limits; paid Premium | All-in-one image editing suite |
| 7 | Imagify | WordPress plugin, web app | JPG, PNG, WebP, AVIF | Server | Limited free plan; paid plans | WordPress users wanting simplicity |
| 8 | Optimizilla | Web tool | JPG, PNG, WebP, GIF, SVG | In your browser | Free | Visual quality slider per image |
| 9 | FreeConvert Image Compressor | Web tool | JPG, PNG, GIF | Server | Free with limits; paid plans | Very large files |
| 10 | ImageOptim | Mac desktop app | JPG, PNG, GIF, SVG | On your computer | Free, open source | Mac users doing bulk lossless optimization |
Limits and pricing for third-party tools change often, so check each tool’s website for its current plan details.
[Image 3: see prompt, tool comparison graphic]
1. SiteAuditHub Image Compressor (Best for Private, No-Signup Compression)
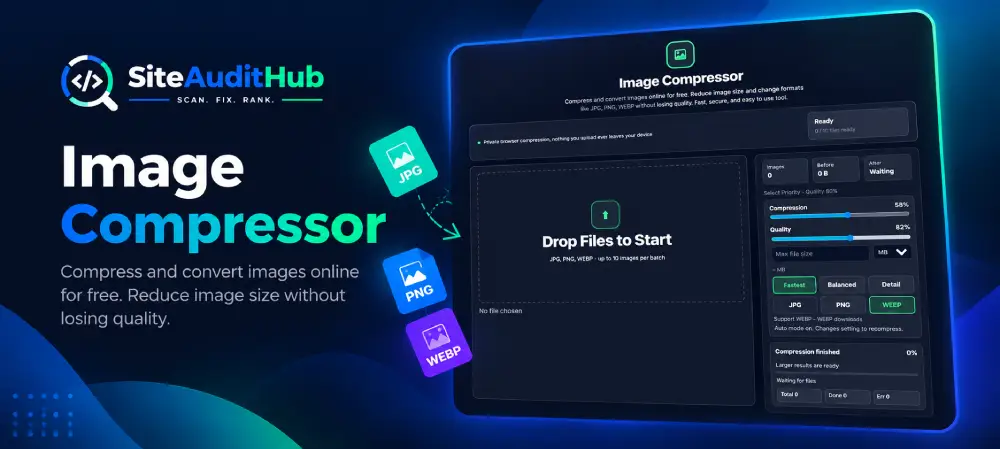
We built the SiteAuditHub Image Compressor after years of using other compressors and running into the same frustrations: files uploaded to servers we knew nothing about, sign-up walls before downloading, ads everywhere, and separate tools needed just to convert a PNG into WebP.
Our answer was simple. The tool compresses and converts images entirely inside your browser. Nothing you add is uploaded to a server, there is no account to create, and there is no watermark on the result.
Key features
- Private browser compression: images are processed locally on your device, so client photos, unreleased product shots and personal documents never leave your computer or phone.
- JPG, PNG and WebP support: add any of the three formats, up to 10 images per batch.
- Compress and convert in one step: export as JPG, PNG or WebP. Turning heavy PNGs or JPGs into lightweight WebP files takes one click.
- Three compression modes: Fastest for quick results, Balanced for everyday website images, and Detail for product photos, portfolios and images with fine text.
- Compression and Quality sliders: fine-tune how aggressively each file is squeezed and how much visual detail is kept.
- Max file size target: enter a limit (for example for an upload form or marketplace) and the tool aims to keep files under it.
- Auto mode: change any setting and the tool recompresses automatically, so you can watch the size update without re-uploading.
- Live stats: see the total size Before and After, and how much you saved.
- Download All (ZIP): grab the whole batch in one file, or download images one by one.
How to use it
- Open the Image Compressor and drag your JPG, PNG or WebP images into the Drop Files to Start area (up to 10 at a time).
- Choose a mode: Fastest, Balanced or Detail.
- Adjust the Compression and Quality sliders if needed. For most website photos, a quality of around 75% to 85% looks identical to the original.
- Optionally, set a Max file size.
- Pick your output format: JPG, PNG or WebP. For website images, WebP is usually the best choice.
- Review the Before and After sizes and check the images visually.
- Click Download All (ZIP), or download images individually. Use Clear to start a new batch.
Pros
- Completely free, with no sign-up and no watermark
- Files never leave your device, which is ideal for sensitive or client images
- No upload or download wait, since there is no server round trip
- Compression and format conversion in the same tool
- Useful controls (modes, sliders, max file size) without being complicated
- Works on desktop and mobile browsers
Cons
- Supports JPG, PNG and WebP only, so there is no GIF, SVG or AVIF support yet
- 10 images per batch, so very large libraries need several rounds
- Processing speed depends on your own device; very large images on an older phone will be slower than on a laptop
- No WordPress plugin or API; it is designed for compressing images before you upload them
Best for
Bloggers, content writers, store owners, freelancers and agencies who want a fast, private way to compress and convert website images before upload, without creating yet another account.
Verdict: if privacy and simplicity matter to you, and your images are JPG, PNG or WebP, this is the tool I would start with.
Try it free: SiteAuditHub Image Compressor
2. TinyPNG (Best for Reliable One-Click Compression)
TinyPNG, run by Tinify, is one of the best-known image compressors on the web, and it still holds up well after all these years. Despite the name, it handles more than PNG. You drop in images, it applies its smart lossy compression automatically, and you download noticeably smaller files with very little visible change.
The free web tool lets you compress up to 20 images at a time, with a maximum of 5 MB per image. Beyond the web tool, Tinify offers a developer API, a WordPress plugin and paid plans for heavier use, and it can convert images to modern formats such as WebP and AVIF.
Key features
- Smart lossy compression for PNG, JPG and WebP
- Batch upload of up to 20 images on the free web tool
- Format conversion to modern formats
- Developer API and WordPress plugin
- Paid Pro plan for larger files and higher volumes
Pros
- Very simple: drop images in and download
- Consistently good compression results, especially for PNG
- Mature ecosystem with API and CMS integrations
Cons
- Images are uploaded to Tinify’s servers for processing
- 5 MB per-image limit on the free tool
- Little manual control over quality in the free web version
Best for
Anyone who wants dependable results with zero configuration, and developers who want to automate compression through an API.
Website: tinypng.com
3. Squoosh (Best for Fine-Tuning a Single Image)
Squoosh is a free, open-source image compression web app built by Google’s Chrome Labs team. It is the tool I recommend when one image really matters, such as a homepage hero banner, and you want to squeeze every kilobyte out of it while watching the quality with your own eyes.
Squoosh shows a split-screen comparison: the original on one side, the compressed version on the other, with a draggable divider. You can switch codecs, resize the image, reduce the colour palette and adjust detailed encoder settings, all while seeing the resulting file size in real time. Like our tool, it processes images in your browser.
Key features
- Side-by-side visual comparison with a slider divider
- Many output formats, including JPG (MozJPEG), PNG, WebP and AVIF
- Built-in resizing and palette reduction
- Advanced encoder settings for experienced users
- Runs in the browser; open source
Pros
- More control over a single image than any other tool on this list
- Excellent for learning how formats and quality settings affect results
- Free, private and ad-free
Cons
- One image at a time, so it is slow for batches
- The number of settings can overwhelm beginners
Best for
Developers, designers and perfectionists optimizing key images one by one, especially when testing AVIF or WebP settings.
Website: squoosh.app
4. ShortPixel (Best for Automated WordPress Optimization)
ShortPixel is a popular image optimization service that is best known for its WordPress plugin, although it also offers a free online compressor. Once the plugin is installed, it can optimize every image you upload and also bulk-optimize the images already sitting in your media library.
One feature I like is its three compression levels. Lossy gives the biggest savings, Glossy keeps a bit more quality for photographers and stores that care about crisp images, and Lossless keeps images pixel-identical to the original. It can also create WebP and AVIF versions of your images.
Key features
- Lossy, Glossy and Lossless compression modes
- WordPress plugin with automatic and bulk optimization
- WebP and AVIF conversion
- Free online compressor for quick jobs
- Credit-based paid plans, plus a small free monthly quota
Pros
- Set-and-forget automation for WordPress
- Can optimize an entire existing media library
- Flexible quality levels
Cons
- The free quota is small for busy sites
- Processing happens on ShortPixel’s servers
- Plugins add another moving part to your WordPress setup
Best for
WordPress site owners with large media libraries who want optimization to happen automatically on upload.
Website: shortpixel.com
5. Compressor.io (Best for Choosing Between Lossy and Lossless)
Compressor.io is a clean, minimal online compressor that supports a wide range of formats, including JPG, PNG, GIF, SVG and WebP. Its main strength is that it lets you choose between lossy and lossless compression, so you can decide whether you want maximum savings or zero quality change.
The free version accepts files up to 10 MB, which is generous for most website images.
Key features
- Lossy and lossless compression options
- Supports JPG, PNG, GIF, SVG and WebP
- Free files up to 10 MB
- Simple, distraction-free interface
Pros
- Wide format support, including SVG and GIF
- Clear choice between lossy and lossless
- Easy for beginners
Cons
- Files are processed on a server
- Fewer fine-tuning controls than Squoosh or our tool
- Batch features are more limited on the free version
Best for
Users who work with mixed formats, including SVG and GIF, and want a simple lossy or lossless choice.
Website: compressor.io
6. iLoveIMG (Best All-in-One Image Toolkit)
iLoveIMG is less of a single compressor and more of a full toolbox for images. Alongside its compressor, which handles JPG, PNG, SVG and GIF, you get tools to resize, crop, convert, rotate, add watermarks and more, all from the same website.
If you often need to do two or three things to an image before publishing, such as resizing it, converting it and then compressing it, having everything in one place saves time.
Key features
- Batch image compression for common formats
- Resize, crop, convert, rotate and watermark tools on the same site
- Import from cloud storage services
- Free with usage limits; Premium plan for more
Pros
- Huge range of image tools in one place
- Friendly interface suitable for non-technical users
- Handy for multi-step image workflows
Cons
- Files are uploaded to servers for processing
- Limited control over compression strength on the free plan
- Ads and upsells on the free version
Best for
Social media managers, marketers and small business owners who regularly resize, convert and compress images together.
Website: iloveimg.com
7. Imagify (Best for Simple WordPress Setup)
Imagify is a WordPress image optimization plugin from WP Media, the team behind the well-known WP Rocket caching plugin. It is built to be simple: install the plugin, connect your account, and new uploads are compressed automatically. It can also bulk-optimize existing images and generate WebP and AVIF versions.
Imagify also has a web app where you can compress images without WordPress.
Key features
- Automatic optimization on upload in WordPress
- Bulk optimization of the existing media library
- WebP and AVIF generation
- Backup of original images, so you can restore them
- Limited free plan, with paid plans for larger volumes
Pros
- Very beginner-friendly setup
- Works nicely alongside WP Rocket
- Keeps originals so optimization is reversible
Cons
- The free plan’s monthly allowance is small
- Only really useful if you run WordPress
- Server-side processing
Best for
WordPress users, especially those already using WP Rocket, who want image optimization handled automatically with minimal setup.
Website: imagify.io
8. Optimizilla (Best for Per-Image Quality Control)
Optimizilla, now available at imagecompressor.com, has been a favourite of bloggers for years because of its simple quality slider and before-and-after comparison view. You add a batch of images, the tool picks sensible settings automatically, and then you can click into any image and adjust its quality individually while comparing it with the original.
According to its current website, it supports JPG, PNG, WebP, GIF and SVG, and processes images in the browser. For PNGs, it reduces the colour palette, which works very well for logos, icons and screenshots.
Key features
- Automatic compression settings for each image
- Per-image quality slider with side-by-side comparison
- Colour palette reduction for PNG graphics
- Batch processing and ZIP download
Pros
- Very easy to see exactly how much quality you are trading for size
- Each image can be tuned separately
- Free to use
Cons
- Fewer conversion options than dedicated converters
- Tuning images one by one takes time on large batches
Best for
Bloggers and designers who like to eyeball each image and choose the quality level themselves.
Website: imagecompressor.com
9. FreeConvert Image Compressor (Best for Very Large Files)
FreeConvert is primarily a file conversion platform, but its image compressor is worth a spot on this list for one reason: file size limits. It accepts very large files, up to 1 GB on the free tier, which is far more than most compressors allow.
It applies lossy compression to JPG, PNG and GIF images and supports batch compression. Files are transferred over an encrypted connection and, according to FreeConvert, deleted automatically after a few hours.
Key features
- Large file support on the free tier
- Batch compression for JPG, PNG and GIF
- Works alongside FreeConvert’s resizer, converter and other image tools
- Paid plans for more usage
Pros
- Handles huge images that other free tools reject
- Part of a big suite of conversion tools
- No software to install
Cons
- Files are uploaded to FreeConvert’s servers
- No WebP compression listed on the compressor itself
- Free usage is limited, with prompts to upgrade
Best for
Photographers and anyone dealing with very large, high-resolution files that need shrinking before they can even be edited or shared.
Website: freeconvert.com
10. ImageOptim (Best Desktop App for Mac Users)
ImageOptim is a free, open-source desktop app for macOS. You drag images, or entire folders, onto its window, and it optimizes them in place on your computer. By default it focuses on lossless optimization: it strips hidden metadata such as camera details and GPS location and repacks files more efficiently, so the images look exactly the same. You can enable lossy settings in its preferences for bigger savings.
Because it runs on your own machine, it is private and has no upload limits, which makes it excellent for bulk work.
Key features
- Drag-and-drop optimization of files and whole folders
- Lossless by default, with optional lossy settings
- Removes metadata, including location data, for privacy
- Free and open source
Pros
- Private and offline
- Great for bulk-optimizing large image folders
- No file limits or accounts
Cons
- Mac only
- Lossless mode gives modest savings on photos unless you enable lossy settings
- No built-in WebP conversion in the desktop app
Best for
Mac-based designers and developers who optimize large folders of images before adding them to projects.
Website: imageoptim.com
How to Choose the Right Image Compressor
With ten good options, the right choice comes down to how you work. Here is a quick way to decide.
| If you want… | Choose |
|---|---|
| Free, private compression with no sign-up | SiteAuditHub Image Compressor |
| To convert JPG or PNG to WebP while compressing | SiteAuditHub Image Compressor |
| Zero-configuration, reliable results | TinyPNG |
| Maximum control over one important image | Squoosh |
| Automatic optimization of every WordPress upload | ShortPixel or Imagify |
| SVG and GIF support in a simple web tool | Compressor.io |
| Resize, convert and compress in one place | iLoveIMG |
| To adjust quality image by image | Optimizilla |
| To compress very large files | FreeConvert |
| Offline bulk optimization on a Mac | ImageOptim |
My recommended workflow
For most bloggers and store owners, the best setup is not a single tool but a simple habit:
- Compress before you upload. Use the SiteAuditHub Image Compressor to compress and convert images to WebP before they ever reach your website. This keeps your media library, backups and every auto-generated thumbnail small.
- Use Squoosh for your one or two most important images, such as the homepage hero, when you want to fine-tune them.
- Add a plugin only if you need it. If your WordPress site already has thousands of unoptimized images, a plugin like ShortPixel or Imagify can clean up the backlog. After that, keep compressing new images before upload.
Browser-based vs server-based: why it matters
Most tools on this list upload your images to their servers. That is usually fine, but browser-based tools like SiteAuditHub, Squoosh and Optimizilla, and desktop apps like ImageOptim, keep files on your device. If you handle client work, unreleased products, ID documents or anything confidential, pick one of those.
Tips to Compress Images Without Losing Quality
Whichever tool you pick, these habits make the biggest difference.
1. Pick the right format
- WebP: the best default for most website images. It is typically smaller than JPG and PNG, and supports transparency.
- JPG: photos, when a platform or portal does not accept WebP.
- PNG: logos, icons and screenshots with sharp edges or transparency. Never use PNG for photographs; it is usually several times heavier.
2. Resize before you compress
Dimensions matter as much as quality. A 4000-pixel photo displayed in an 800-pixel column still downloads at full size. As a rough guide, keep full-width banners around 1600 to 1920 pixels wide, blog images around 1200 pixels, and thumbnails under 400 pixels.
3. Use sensible quality settings
For photos, a quality of around 75 to 85 is where file size drops sharply but the image still looks identical at normal viewing size. Go higher for product photos or images with text, and lower for small thumbnails.
4. Aim for realistic file sizes
- Hero banners: under 200 KB
- Blog and content images: under 100 to 150 KB
- Product images: under 150 to 200 KB
- Icons and small graphics: under 20 KB
5. Always check the result
Zoom to the size the image will actually appear on your site. Look for blocky patches, banding in skies and gradients, and blurry text. If you see any, raise quality slightly.
6. Keep your original
Every lossy save removes a little more data. Keep an uncompressed master and always compress from it, rather than re-compressing an already compressed file.
7. Finish the job on your website
Name files descriptively (for example best-image-compressor-tools.webp), add alt text, lazy-load images below the fold, and do not lazy-load your main hero image, since that usually slows down your Largest Contentful Paint (LCP). Then measure the improvement with our free SEO Analyzer.
Frequently Asked Questions
1. Which is the best image compressor tool?
It depends on your needs. For free, private compression and WebP conversion without sign-up, the SiteAuditHub Image Compressor is a strong choice. TinyPNG is great for one-click results, Squoosh for fine-tuning single images, and ShortPixel or Imagify for automatic WordPress optimization.
2. What is the best free image compressor?
SiteAuditHub Image Compressor, Squoosh, Optimizilla and ImageOptim are all completely free. TinyPNG, Compressor.io, iLoveIMG and FreeConvert have free versions with limits.
3. Does compressing an image reduce its quality?
Lossless compression does not change the image at all. Lossy compression removes some data, but at sensible settings (quality around 75 to 85) the difference is not visible at normal viewing size.
4. Is it safe to compress images online?
Most online tools upload your images to their servers and delete them after a while. For private or sensitive images, use a tool that processes files in your browser, such as the SiteAuditHub Image Compressor, so your files never leave your device.
5. Is the SiteAuditHub Image Compressor free?
Yes. It is completely free, with no sign-up and no watermark.
6. How many images can I compress at once with SiteAuditHub?
Up to 10 JPG, PNG or WebP images per batch, and you can download them together as a ZIP file.
7. Can I convert PNG or JPG to WebP?
Yes. In the SiteAuditHub Image Compressor, add your images, choose WebP as the output format and download. It compresses and converts in the same step.
8. Which image format is best for websites?
WebP is the best default for most websites because it is smaller than JPG and PNG at similar quality and supports transparency. Keep JPG or PNG for platforms that require them.
9. Do I need a WordPress plugin if I compress images before upload?
Not necessarily. If you compress every image before upload, a plugin is optional. Plugins are most useful for cleaning up a large library of old, unoptimized images or for sites with many contributors.
10. Does image compression help SEO?
Indirectly, yes. Smaller images make pages load faster, which improves Core Web Vitals such as LCP and the overall user experience, both of which support better search performance.
Conclusion: Pick a Tool and Make It a Habit
There is no shortage of good image compressors. TinyPNG is dependable, Squoosh gives you the most control, ShortPixel and Imagify automate WordPress, iLoveIMG bundles everything together, and ImageOptim is a great offline option for Mac users.
The tool matters less than the habit, though. The sites that stay fast are the ones where every image is resized, compressed and converted before it is uploaded. Build that into your routine and your pages will stay light no matter how much content you add.
If you want the quickest way to start, try the tool we built for exactly this. The SiteAuditHub Image Compressor is free, needs no sign-up, converts to WebP in the same step, and keeps every file inside your browser.
For more on the basics of reducing image size, read our earlier guide, Image Compressor Online: Reduce Image Size Without Losing Quality. And once your images are sorted, check the rest of your site with our Broken Link Checker and Sitemap Generator.
Need help speeding up your website? Chat with us on WhatsApp.